
Table of Contents
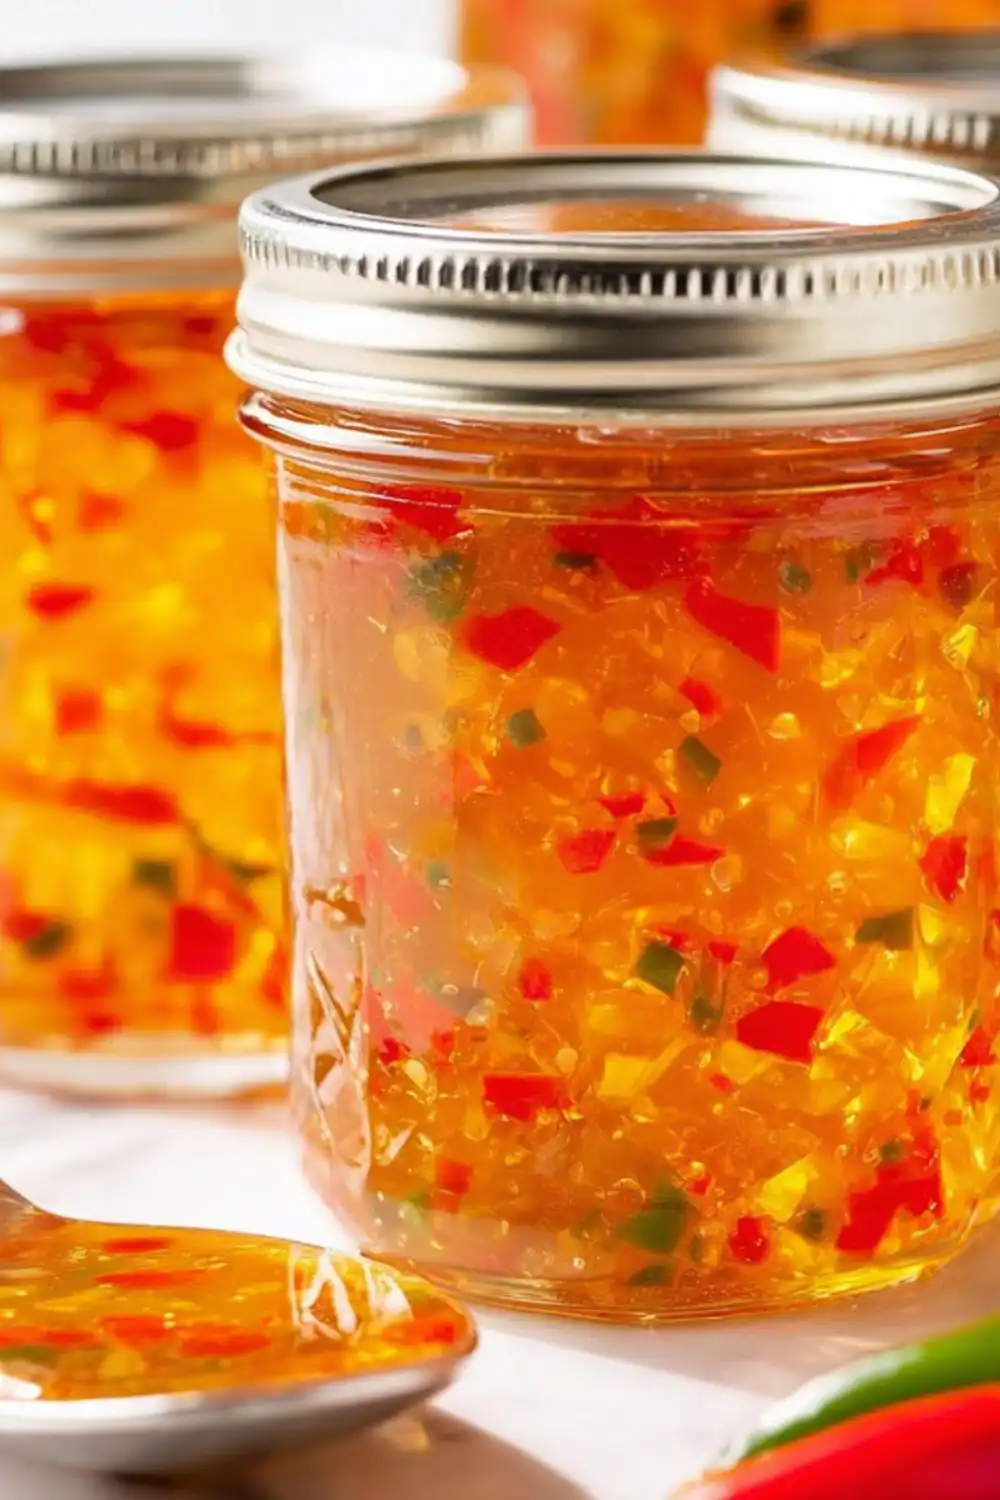
Pepper jelly recipe creates a vibrant, sweet-and-spicy preserve that transforms fresh red and green peppers into an addictive condiment. This homemade pepper jelly combines the brightness of bell peppers with a gentle heat kick and sticky-sweet consistency perfect for any kitchen. Unlike store-bought versions, making pepper jelly at home lets you control the heat level, sweetness, and pepper blend to suit your exact preferences.
| Metric | Value |
|---|---|
| Prep Time | 20 minutes |
| Cook Time | 25 minutes |
| Total Time | 45 minutes plus setting time |
| Servings | Approximately 40 servings (five 8-ounce jars) |
| Difficulty Level | Intermediate |
| Cuisine Type | American Condiment |
Why This Recipe Works
I’ve made this pepper jelly recipe countless times, and it consistently delivers restaurant-quality results. The combination of red and green peppers creates a beautiful color gradient while providing natural pectin sources that help the jelly set properly. The two-stage boiling process first softens the peppers, then reheats with pectin to achieve that signature glossy, spreadable texture.
The resting periods in this recipe are genuinely important. After the initial gentle boil, allowing the mixture to stand for twenty minutes lets flavors meld and allows pepper pieces to distribute evenly throughout the liquid. The final five to eight minute stirring phase prevents peppers from floating to the top of finished jars, which creates a professional presentation in your canned pepper jelly.

This recipe yields approximately five 8-ounce jars, making it perfect for holiday gifting or stocking your pantry. The hot pepper sauce or flakes add just enough heat to balance the sugar without overwhelming the delicate pepper flavor. Using liquid pectin ensures consistent setting without requiring multiple batches or lengthy cooking times.
Ingredients
| Ingredient | Quantity | Notes and Alternatives |
|---|---|---|
| Red bell peppers, finely chopped | 1 cup | Use fresh, firm peppers. Substitute with red poblanos for deeper flavor. |
| Green bell peppers, finely chopped | 1 cup | Must be fresh. Green poblanos add earthiness; substitute half with yellow peppers for complexity. |
| Jalapeño peppers, minced | 1 to 2, optional | Adds heat. Use serrano peppers for more spice; omit entirely for sweet version. |
| Cider vinegar | 1 1/2 cups | Provides tang and helps preserve. Apple cider vinegar is ideal; white vinegar acceptable but less flavorful. |
| Hot pepper sauce or hot pepper flakes | 1/2 tsp sauce or 1/4 tsp flakes | Adjusts heat level. Use less for mild pepper jelly; increase for spicy version. |
| Granulated sugar | 6 1/2 cups | Essential for setting and preservation. Cannot substitute with honey or artificial sweeteners. |
| Liquid pectin | Two 3-ounce pouches | Ensures proper gel consistency. Must be liquid type, not powdered. |

Pepper Jelly Recipe
- Total Time: 50 minutes
- Yield: 5 jars (8 oz each) 1x
- Diet: Vegetarian
Description
This homemade pepper jelly is sweet, slightly spicy, and packed with vibrant flavor. With colorful red and green peppers suspended in a glossy golden jelly, it’s perfect for serving over cream cheese, pairing with crackers, or using as a glaze for meats. Simple to make and always a crowd favorite.
Ingredients
1 cup finely chopped red bell peppers
1 cup finely chopped green bell peppers
1–2 jalapeño peppers, minced (optional)
1 1/2 cups cider vinegar
1/2 tsp hot pepper sauce or 1/4 tsp hot pepper flakes
6 1/2 cups granulated sugar
2 pouches (3 oz each) liquid pectin
Instructions
1. In a large heavy-bottomed pot, combine red peppers, green peppers, jalapeños (if using), vinegar, hot pepper sauce, and sugar
2. Bring mixture to a boil over medium heat, stirring constantly until sugar dissolves
3. Reduce heat and boil gently for 5 minutes
4. Remove from heat and let stand for 20 minutes, stirring occasionally
5. Return mixture to high heat and bring to a full rolling boil
6. Stir in liquid pectin immediately and return to a hard boil
7. Boil for 1 minute while stirring constantly
8. Remove from heat and skim off any foam
9. Stir for 5–8 minutes to keep peppers evenly distributed
10. Ladle into sterilized jars leaving 1/4 inch headspace
11. Wipe rims, apply lids, and tighten bands fingertip-tight
12. Process jars in a boiling water bath for 10 minutes
13. Let jars cool at room temperature until set, then check seals before storing
Notes
Finely chop peppers for even texture and better suspension
Stir after cooking to prevent peppers from floating to the top
Adjust heat by adding or reducing jalapeños
Store sealed jars in a cool dark place, refrigerate after opening
Perfect served over cream cheese or as a glaze for chicken or pork
- Prep Time: 20 minutes
- Cook Time: 30 minutes
- Category: Condiment
- Method: Canning
- Cuisine: American
Nutrition
- Serving Size: 1 tablespoon
- Calories: 50
- Sugar: 12g
- Sodium: 5mg
- Fat: 0g
- Saturated Fat: 0g
- Unsaturated Fat: 0g
- Trans Fat: 0g
- Carbohydrates: 13g
- Fiber: 0g
- Protein: 0g
- Cholesterol: 0mg
Step-by-Step Instructions
Preparation Phase
- Combine red peppers, green peppers, jalapeño peppers (if using), cider vinegar, hot pepper sauce or flakes, and granulated sugar in a large, deep, heavy-bottomed pot. Stir together until sugar begins to dissolve.
- Prepare five 8-ounce canning jars by washing them in hot soapy water and sterilizing in a boiling water bath or oven at 225°F for fifteen minutes. Keep jars hot until ready to fill.
- Prepare canning lids and bands according to manufacturer instructions, usually by simmering in hot water.
First Cooking Phase
- Bring the pepper mixture to a boil over medium heat, stirring constantly to prevent sticking and ensure even heating.
- Reduce heat to maintain a gentle boil and cook for exactly five minutes, stirring frequently to keep peppers from settling.
- Remove from heat and let the mixture stand for twenty minutes, stirring occasionally to distribute peppers throughout the liquid.
Second Cooking and Setting Phase
- Bring the mixture to a full rolling boil over high heat, stirring constantly throughout the heating process.
- Immediately stir in liquid pectin from both pouches until fully incorporated, then return to a full boil.
- Boil hard for exactly one minute, stirring constantly to prevent scorching on pot bottom.
- Remove from heat and skim off any foam that has formed on the surface using a clean spoon.
- Stir continuously for five to eight minutes to distribute peppers evenly and prevent floating.
Jarring and Processing
- Ladle the pepper jelly into prepared jars, leaving exactly one quarter inch of headspace from the rim.
- Wipe jar rims clean with a damp cloth to remove any spills or residue that could prevent proper sealing.
- Apply prepared lids and metal rings, tightening just until fingertip-tight to allow steam to escape during processing.
- Process jars in a boiling water canner for ten minutes at a rolling boil, starting the timer after water returns to boil.
- Transfer processed jars to a towel-lined surface and let rest undisturbed at room temperature until completely cooled.
- Check seals by pressing center of each lid; sealed lids should not flex. Refrigerate any unsealed jars and use within three weeks.
Float Testing (Optional but Recommended)
- To test for floating peppers, fill one jar with jelly and let rest for one minute while still warm.
- If peppers start to float upward, pour jelly back into the pot and continue stirring for additional minutes before trying again with a new sterilized jar.
Chef Tips for Perfect Results
- Chop peppers uniformly and finely to ensure they cook evenly and distribute without floating in finished pepper jelly.
- Use a heavy-bottomed pot to distribute heat evenly and prevent hot spots that burn pepper jelly on the bottom.
- Never skip the twenty-minute resting period after the first boil; this develops deeper pepper flavor and helps gel formation.
- Stir constantly during the final five to eight minutes; this step prevents floating peppers better than any other technique.
- Keep jars hot in a warm water bath until ready to fill to prevent jars from cracking when you pour hot jelly.
- If pepper jelly doesn’t set after cooling completely, recook with one additional pouch of pectin and reprocess jars.
Common Mistakes to Avoid
Mistake 1: Skipping the Gentle Boil Phase
Many home canners jump directly to adding pectin and boiling hard. This prevents proper flavor development and creates an overly firm jelly. The initial five-minute gentle boil softens peppers and allows their flavors to infuse into the syrup. Always complete both cooking phases as written in your pepper jelly recipe.
Mistake 2: Rushing the Stirring Phase
The five to eight minute post-cooking stir is critical for preventing peppers from floating. Stopping too early allows peppers to rise, creating an unattractive presentation. Set a timer and stir continuously for the full duration. If floating occurs, your jelly is still salvageable; simply reheat and reprocess.
Mistake 3: Overtightening Jar Lids
Tightening lids too firmly prevents steam from escaping during processing, which disrupts the seal. Tighten only until you feel resistance, then stop. The term “fingertip-tight” means you can only turn the band with your fingertips without using your full hand strength.
Mistake 4: Using Cold Jars
Cold glass jars can crack when filled with hot pepper jelly, ruining your batch and potentially causing safety issues. Heat jars in a 225°F oven or in your canning water for fifteen minutes before filling. Keep them in hot water until the moment you ladle jelly into them.
Mistake 5: Not Removing Pectin Foam
Foam isn’t harmful but appears as bubbles in finished jelly, reducing visual appeal. Always skim foam from the surface after boiling with pectin. Use a clean metal spoon and discard foam before stirring for distribution.
Variations and Substitutions
| Ingredient | Substitution | Impact on Flavor |
|---|---|---|
| Red and green bell peppers | All red, all yellow, or all orange peppers | Creates uniform color; red provides sweeter jelly, yellow and orange add mild citrus notes. |
| Jalapeño peppers | Serrano peppers, Fresno peppers, or Thai chilies | Serrano adds sharp heat, Fresno provides fruity spice, Thai chilies create intense warmth. |
| Cider vinegar | Apple cider vinegar or white vinegar | Apple cider provides subtle sweetness, white vinegar creates sharper tang. |
| Hot pepper sauce | Increase jalapeños to two full peppers or add cayenne pepper | Fresh peppers add texture while powdered cayenne creates cleaner heat without moisture. |
| Granulated sugar | Cannot be substituted; use only granulated white sugar | No substitutions work; sugar content is essential for preservation and setting. |
Serving Suggestions and Pairings
Pepper jelly recipe shines on a charcuterie board alongside sharp aged cheeses like extra-sharp cheddar, aged gouda, or smoked brie. Spread it on cream cheese appetizers with crispy crackers for an elegant starter at dinner parties. This condiment pairs beautifully with roasted nuts, prosciutto-wrapped melon, and fig presentations at holiday gatherings.
Use pepper jelly as a glaze for grilled chicken breasts or salmon fillets during summer entertaining. Swirl a spoonful into plain Greek yogurt for an unexpected vegetable dip at cookouts. Serve alongside pulled turkey sandwiches or layered into dessert cheesecakes for sweet-savory contrast at upscale brunches.
Gift pepper jelly to cheese enthusiasts, cooking enthusiasts, or anyone who loves sweet-and-spicy condiments. Package five jars in a decorative box with recipe cards suggesting pairings for Christmas, housewarming, or thank-you occasions. The homemade pepper jelly impresses far more than commercial versions and stores for eighteen months in a cool, dark pantry.
Storage and Reheating
| Storage Method | Duration | Instructions |
|---|---|---|
| Sealed Jars at Room Temperature | Up to 18 months | Store in a cool, dark pantry or cupboard away from direct sunlight. Check seals monthly; discard any jars showing mold or fermentation. |
| Unsealed Jars in Refrigerator | Up to 3 weeks | Keep unsealed jars in the coldest part of your refrigerator. Use a clean spoon each time to scoop jelly and prevent contamination. |
| Opened Sealed Jars | Up to 3 weeks refrigerated | Cover opened jars tightly and refrigerate immediately. Always use clean utensils when removing jelly to prevent mold. |
| Freezer Storage | Up to 2 years | Transfer pepper jelly to freezer-safe containers, leaving half-inch headspace. Thaw overnight in refrigerator before serving. |
Nutritional Information
Approximate values per 1-tablespoon serving (15g):
| Nutrient | Amount per Serving |
|---|---|
| Calories | 50 |
| Carbohydrates | 13g |
| Sugars | 12g |
| Fiber | 0g |
| Fat | 0g |
| Protein | 0g |
| Sodium | 15mg |
| Vitamin C | 2mg |
Conclusion
This pepper jelly recipe transforms simple peppers into a sophisticated condiment worthy of gifts and entertaining. The combination of sweet sugar, bright vinegar, and gentle heat creates an addictive spread that elevates charcuterie boards, cheese plates, and countless recipes. By following these precise instructions and avoiding common mistakes, you’ll produce shelf-stable pepper jelly that captures summer’s vibrant pepper flavors for year-round enjoyment. Make this homemade pepper jelly today and discover why this sweet-and-spicy classic deserves a permanent place in your pantry.

